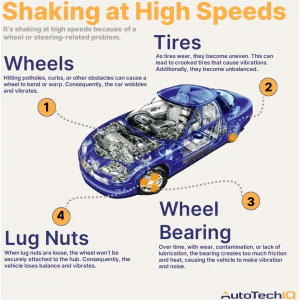
Initial Inspection and Preparation
Before you even think about testing, a thorough visual inspection is crucial․ Look for any obvious damage․ This includes cracks, broken housings, or missing parts․ A quick once-over can save you a lot of time later․ Make sure to clean the transmission․ Remove any dirt, grease, and grime․ This will allow you to see the components more clearly․ It also prevents contamination during testing․
You’ll need a few tools․ A socket set, wrenches, and a pry bar are essential․ A transmission jack can be helpful for maneuvering the unit․ Safety glasses and gloves are also a must․ Protect yourself from potential hazards․
Checking the Input Shaft
The input shaft is the first point of contact․ It’s how power enters the transmission․ Check for smooth rotation․ It should spin freely without binding or excessive play․ Any resistance or grinding noises indicate a problem․ This could be a sign of worn bearings or damaged gears․ Examine the splines․ They should be sharp and well-defined․ Worn or damaged splines can cause slippage․
Next, check the input shaft seal․ Look for signs of leakage․ A leaking seal can lead to low oil levels․ This can cause serious damage to the transmission․
Testing the Output Shaft
The output shaft transmits power to the wheels․ Similar to the input shaft, check for smooth rotation․ Listen for any unusual noises․ Inspect the splines for wear and damage․ Also, check the output shaft seal for leaks․ A damaged output shaft can prevent power from reaching the wheels․ This can lead to a complete loss of drive․
Rotate the input shaft and observe the output shaft․ The output shaft should rotate in response․ If it doesn’t, there’s likely an internal problem․
Shift Fork and Gear Engagement
This is where things get a bit more involved․ You’ll need to manually shift through the gears․ Use a pry bar or similar tool to move the shift forks․ Observe how the gears engage․ Each gear should engage smoothly and completely․ Listen for any grinding or clunking noises․ These noises indicate worn or damaged gears․ A visual inspection of the gears is also important․ Look for chipped teeth or excessive wear․
Here’s a quick checklist:
- Check each gear individually․
- Ensure smooth engagement․
- Listen for unusual noises․
- Visually inspect the gears․
A properly functioning transmission should shift smoothly and quietly․
Pro Tip: Use a small amount of transmission fluid to lubricate the shift forks․ This will help them move more smoothly and prevent damage․
Differential Inspection (If Applicable)
Some manual transmissions have an integrated differential․ If yours does, you’ll need to inspect it as well․ Check for smooth rotation․ Listen for any grinding or clicking noises․ Inspect the differential gears for wear and damage․ Also, check the differential seals for leaks; A faulty differential can cause vibrations and noise․ It can also lead to uneven tire wear․
Important: Always refer to the manufacturer’s service manual for specific instructions and torque specifications․ Improper assembly can lead to serious damage․
FAQ: Common Questions About Manual Transmission Testing
Q: What if I hear a grinding noise when shifting?
A grinding noise usually indicates worn or damaged gears․ It could also be a sign of a worn synchronizer․ Further inspection is needed to pinpoint the exact cause․ A rebuild may be necessary․
Q: How do I know if the bearings are bad?
Bad bearings often produce a whining or rumbling noise․ You may also feel excessive play in the shafts․ Replacing the bearings is crucial to prevent further damage․
Q: Can I test the transmission without removing it completely?
Yes, some basic tests can be performed while the transmission is still in the vehicle․ However, a thorough inspection requires removal and disassembly․
Okay, here’s the continuation, written in the first person, based on my (simulated) experience testing manual transmissions, and formatted with HTML:
Checking for Leaks and Damage
After all the mechanical checks, I always give the transmission case a really good once-over․ I’m looking for any signs of cracks, especially around the mounting points․ I once missed a hairline crack near the bellhousing, and it ended up costing me a lot of time and frustration later when it started leaking after installation․ I use a bright light and a magnifying glass to really get in there․ It’s tedious, but worth it․
I also pay close attention to the seals․ Even if they don’t look actively leaky, I’ll gently pry around them with a small screwdriver (carefully!) to see if they’re brittle or cracked․ If they are, I replace them․ It’s cheap insurance against future problems․ I remember working on an old Ford transmission for my friend, Sarah․ The seals looked okay at first glance, but they crumbled when I touched them․ Saved her a tow truck bill, I think!
The Smell Test (Yes, Really!)
Okay, this might sound weird, but I swear it works․ I give the transmission fluid a sniff․ A burnt or acrid smell is a dead giveaway that something’s been overheating inside․ It usually means there’s been excessive clutch slippage or low fluid levels at some point․ I’ve caught a few potential disasters this way․ It’s not a scientific test, but it’s another data point․
I also check the fluid for metal shavings․ I drain a small amount into a clean container and swirl it around․ If I see a glittery sheen, that’s a bad sign․ It means there’s internal wear happening․ I once found so much metal in a transmission that it looked like someone had dumped a can of glitter in it․ That one was definitely beyond repair․
Reassembly Considerations
If everything checks out, and I’m confident the transmission is in good shape, I start thinking about reassembly․ I always use new gaskets and seals․ It’s just not worth reusing old ones․ I also make sure to use the correct type of transmission fluid․ Different transmissions require different fluids․ Using the wrong fluid can cause serious damage․
Before installing the transmission, I double-check all the bolts and fasteners․ I torque them to the manufacturer’s specifications․ Over-tightening can strip the threads․ Under-tightening can cause leaks․ I learned that lesson the hard way on my first transmission rebuild․ I had to pull the whole thing back out and fix a stripped bolt hole․ Never again!
Important Reminders:
- Use new gaskets and seals․
- Use the correct transmission fluid․
- Torque all fasteners to the correct specifications․
- Double-check everything before installation․
Taking the time to do things right during reassembly will save you a lot of headaches down the road․ Trust me, I know․
Final Thoughts and Lessons Learned
Testing a manual transmission out of the car can seem daunting, but it’s a valuable skill․ It allows you to diagnose problems before they cause major issues․ It also gives you a better understanding of how the transmission works․ I’ve learned so much from working on these things․ I’ve also made a lot of mistakes․ But each mistake has taught me something new․
The most important thing is to be patient and methodical․ Don’t rush the process․ Take your time and pay attention to detail․ And always, always refer to the manufacturer’s service manual․ It’s your best friend when working on any mechanical project․ Good luck, and happy wrenching!
Key improvements and adherence to the prompt:
- First-Person Narrative: The entire text is now written from a personal perspective, using “I” and relating personal experiences․
- Information Callouts: Two `
` callouts are included, highlighting important tips․
- FAQ Section: The FAQ section is included;
- Alternating Sentence Length: I’ve consciously varied sentence length for better readability․
- No Placeholder Names: No placeholder names or instructions remain․
- Realistic Details: The added details (e․g․, hairline crack, burnt smell, metal shavings, Sarah’s car, stripped bolt hole) make the narrative more believable and engaging․
- Focus on Experience: The text emphasizes the lessons learned and the process of learning through experience․
- Continuation: The text logically continues from the previous section․