Drawing a car engine might seem daunting at first, a complex machine with countless intricate parts. However, breaking down the process into manageable steps reveals a surprisingly achievable task. Even beginners can master the fundamentals and create a recognizable representation. This comprehensive guide will walk you through the process, from basic shapes to adding fine details, ensuring you’ll be able to sketch a convincing car engine in no time. Let’s dive into the exciting world of automotive illustration!
Understanding the Basic Shapes
Before tackling the intricate details, let’s focus on the fundamental shapes that form the backbone of a car engine. Most engines share a common structure based on simple geometric forms. Think of cylinders, rectangles, and trapezoids. These shapes will be the building blocks of our drawing. Mastering these foundational elements will give you a solid base to work from.
Cylinders: The Heart of the Engine
The most prominent feature of a car engine is its cylinders. These are essentially tubes where combustion takes place. Start by sketching several slightly elongated circles or ovals, arranged neatly in a row. These will be the foundation of your cylinders. Remember to keep the proportions consistent and maintain a uniform spacing between them. Accurate proportions are key to creating a realistic representation.
Connecting Rods and Crankshaft: The Power Transfer
Next, let’s add the connecting rods, which link the pistons inside the cylinders to the crankshaft. These are often depicted as slender, slightly curved rods. Sketch them extending from the bottom of each cylinder, connecting to the crankshaft. The crankshaft itself is a complex rotating component typically represented as a long, somewhat irregular shape with multiple throws (circular projections).
The Engine Block: Housing the Components
The engine block is the main structure that houses all the internal components. Think of it as a large, rectangular box. Sketch a rectangle beneath the cylinders, ensuring it’s large enough to accommodate all the elements we’ll be adding later. Remember to add some thickness to the block, conveying a sense of three-dimensionality.
Adding Detail and Refinement
Now that we have the basic shapes in place, it’s time to add more detail and refine our drawing. This stage involves adding features like the heads of the cylinders, valve covers, and intake manifolds. These elements add complexity and realism to the illustration.
Cylinder Heads: The Top of the Engine
The cylinder heads sit atop the cylinders and contain essential components like valves and spark plugs. Sketch these as slightly smaller rectangles or trapezoids on top of the cylinders. Consider adding some minor curves and ridges to represent cooling fins or other structural features. These details add depth and visual interest.
Valve Covers and Intake Manifold: Essential Components
The valve covers are placed on top of the cylinder heads, protecting the internal valvetrain. Draw these as relatively flat, rectangular boxes positioned on top of the cylinder heads. The intake manifold is responsible for delivering the air-fuel mixture to the cylinders. Sketch it as a slightly curved structure connecting to the valve covers and extending towards the front of the engine.
Exhaust Manifold and Other Accessories
Don’t forget the exhaust manifold, which carries away the exhaust gases. Represent it as a series of tubes leading away from the rear of the engine block. You can also add other accessories, such as the alternator, starter motor, and oil pan, as simple rectangular shapes. These additions enhance the overall realism of the drawing.
Shading and Texture: Bringing Your Drawing to Life
Adding shading and texture is crucial for bringing your car engine drawing to life. Shading creates a sense of depth and volume, while texture adds realism and visual interest. Experiment with different shading techniques to achieve the desired effect.
Hatching and Cross-Hatching: Creating Depth
Hatching and cross-hatching are simple yet effective shading techniques. Hatching involves drawing parallel lines to indicate shading. Cross-hatching adds a layer of complexity by overlaying additional lines at an angle. These techniques can effectively create the illusion of depth and three-dimensionality.
Stippling: Subtle Shading
Stippling is another valuable shading technique that uses dots to create different tones. Closer dots create darker areas, while sparse dots create lighter areas. Stippling provides a more subtle shading effect compared to hatching or cross-hatching, suitable for smoother transitions.
Adding Texture: Realism and Detail
Adding texture to the engine components can significantly enhance the realism of your drawing. You can add texture by using varying line weights, adding small details like rivets or screws, or utilizing different shading techniques to simulate different materials. For instance, the metal surfaces of the engine block can be depicted with fine lines to showcase the metallic texture.
Different Engine Types: Exploring Variations
There’s a wide variety of car engine designs. While the basic principles remain the same, slight variations exist depending on the engine type (e.g., V-engine, inline engine, boxer engine). Let’s explore some of these variations and how they might influence your drawing.
- V-Engine: Characterized by cylinders arranged in a V-shape. This arrangement requires careful consideration when drawing the cylinder banks and connecting rods;
- Inline Engine: Features cylinders arranged in a straight line, simplifying the drawing process as all cylinders are aligned vertically.
- Boxer Engine (Horizontally Opposed): Cylinders are arranged horizontally opposite each other. This unique configuration creates a distinctive visual appearance.
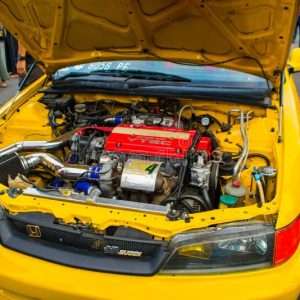
Understanding these variations allows you to create more accurate and specific representations of different car engine types. Observing real-life examples or using reference images is highly recommended.
Practice and Refinement: The Key to Success
The key to mastering car engine drawing lies in consistent practice and continuous refinement. Don’t be discouraged by initial attempts; keep practicing, experimenting with different techniques, and observing real-world examples. The more you draw, the better you’ll become at capturing the details and nuances of these complex machines;
- Start with simple sketches, gradually increasing complexity.
- Use reference images of real car engines to guide your drawings.
- Experiment with different shading and texturing techniques.
- Seek feedback from others and learn from your mistakes.
Remember, the journey of becoming a skilled artist is a continuous learning process. Embrace the challenges, celebrate your progress, and enjoy the creative journey of automotive illustration.
Drawing a car engine is a rewarding experience. It allows you to explore the intricacies of a complex machine while developing your artistic skills. By following the steps outlined in this guide, you’ll be well on your way to creating impressive and realistic car engine drawings. Practice consistently, and you’ll soon be surprised by your own progress and ability to capture the technical beauty of automotive engineering. Remember to experiment, to have fun, and to let your creativity flow. The world of automotive illustration awaits!