Welcome to the exciting world of 3D modeling car engines in Blender! This guide will walk you through the fundamental steps, from gathering references to creating a detailed and realistic engine model. We will cover essential techniques and best practices. Get ready to unleash your creativity!
Modeling a car engine can seem daunting at first. However, with a structured approach, it becomes a manageable and rewarding project. Let’s begin!
Gathering References and Planning
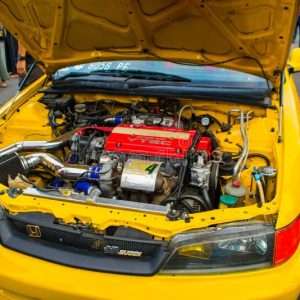
Before diving into Blender, it’s crucial to gather high-quality reference images of the engine you want to model. These images will serve as your blueprint. Find images from multiple angles: front, side, top, and back. Also, look for detailed close-ups of specific components.
Tip: Use websites like Google Images, Pinterest, and manufacturer websites to find detailed engine diagrams and photographs. Don’t underestimate the power of a good blueprint!
Key Considerations:
- Engine Type: Determine the specific engine model you want to replicate.
- Level of Detail: Decide how detailed your model needs to be. Will it be used for a close-up render or a background element?
- Time Commitment: Realistic engine modeling takes time and patience. Plan accordingly.
Planning is key. A well-defined plan will save you time and frustration in the long run. It’s a very important step.
Basic Modeling Techniques in Blender
Now, let’s get our hands dirty in Blender! We’ll start with basic modeling techniques like:
- Extrusion: Creating volume from faces.
- Loop Cuts: Adding edge loops for better control over geometry.
- Beveling: Rounding edges for a more realistic look.
- Subdivision Surface Modifier: Smoothing out the model.
These techniques are the building blocks of 3D modeling. Practice them until they become second nature. It’s a skill that will serve you well.
Start with simple shapes and gradually add complexity. Don’t be afraid to experiment!
Creating Key Engine Components
Let’s focus on modeling some of the key engine components:
Engine Block:
The foundation of the engine. Start with a cube and use extrusion and loop cuts to shape it.
Cylinder Head:
A more complex component. Pay close attention to the details and use reference images extensively.
Intake Manifold:
Often a visually interesting part. Use curves to create smooth, flowing shapes.
Information: Remember to use the Subdivision Surface modifier to smooth out the hard edges and create a more realistic look. Adjust the subdivision levels to balance detail and performance.
Texturing and Materials
Once the modeling is complete, it’s time to add textures and materials to bring your engine to life. Use Blender’s node-based material system to create realistic surfaces.
- Metal: Use a metallic shader with roughness and normal maps.
- Rubber: Use a diffuse shader with a subtle bump map.
- Plastic: Use a glossy shader with a slight roughness.
Experiment with different textures and materials to achieve the desired look. Don’t be afraid to try new things. It’s all part of the learning process.
FAQ: Frequently Asked Questions
Q: Where can I find free engine models to study?
A: Websites like Sketchfab and TurboSquid offer free and paid 3D models. Be sure to check the license before using them in your projects. Studying existing models can be a great way to learn new techniques.
Q: What are some good resources for learning Blender?
A: YouTube is a treasure trove of Blender tutorials. Channels like Blender Guru and CG Cookie offer comprehensive courses and tutorials. Also, the official Blender documentation is a valuable resource.
Q: How long does it take to model a car engine in Blender?
A: It depends on the level of detail and your experience. A simple engine model might take a few hours, while a highly detailed model could take several days or even weeks. Patience is key!